
After months of anticipation, this week we started the third (and final) installment of the Billy y las Botas saga. I like to use a variety of strategies when telling a Wooly story, so this time we focused on making predictions. This is a great way to preview the story, as well as letting your students show their creative side and impress you with their language.
Step One: I started by pulling out 12 slides from the Powerpoint of Stills available in the extras section of every story with a SenorWooly.com Pro-subscription (if you don’t already have this, leave this post, buy it, and come back).
This activity is similar to the “Bunches of Hunches” activity combined with “A Parallel Universe” story that some of you may have used during Wooly Week 2019. Careful, not to give too much away and certainly no spoilers; you want to leave some ambiguity.
 Step Two: I then added some prediction prompts on each slide. I used PearDeck, which you can get as a add-on to google slides, and added questions to each slide. Each student joins the presentation with a class code and can see the picture on their screen and can type in their answer. (Here’s what it looks like on the student side) In the background, I am playing the instrumental version of the song (available on the “music” tab of the story on SenorWooly.com) on a constant loop. The answers show up on my screen and I can choose to project them to the class (and offer editing suggestions).
 With PearDeck, you can allow the students to work at their own pace and go through the entire presentation. However, for this lesson, I choose to control the pacing so students were all on the same page.
As students saw more and more images, a story started to form in their head. In this case, students began predicting that Gorro was stealing Las Botas from Billy… some students were shocked that Gorro would betray his best friend. Each new scene seemed to play into this prediction. Going through about 10-12 slides and writing their responses took up 35-40 minutes.
Step Three: That weekend, I looked through their responses and compiled the most interesting responses, editing for grammar/accuracy. I used this to present to the class as additional input. They get to read what their classmates read and get repetition of important structures. I always look for a way to give them More Input!
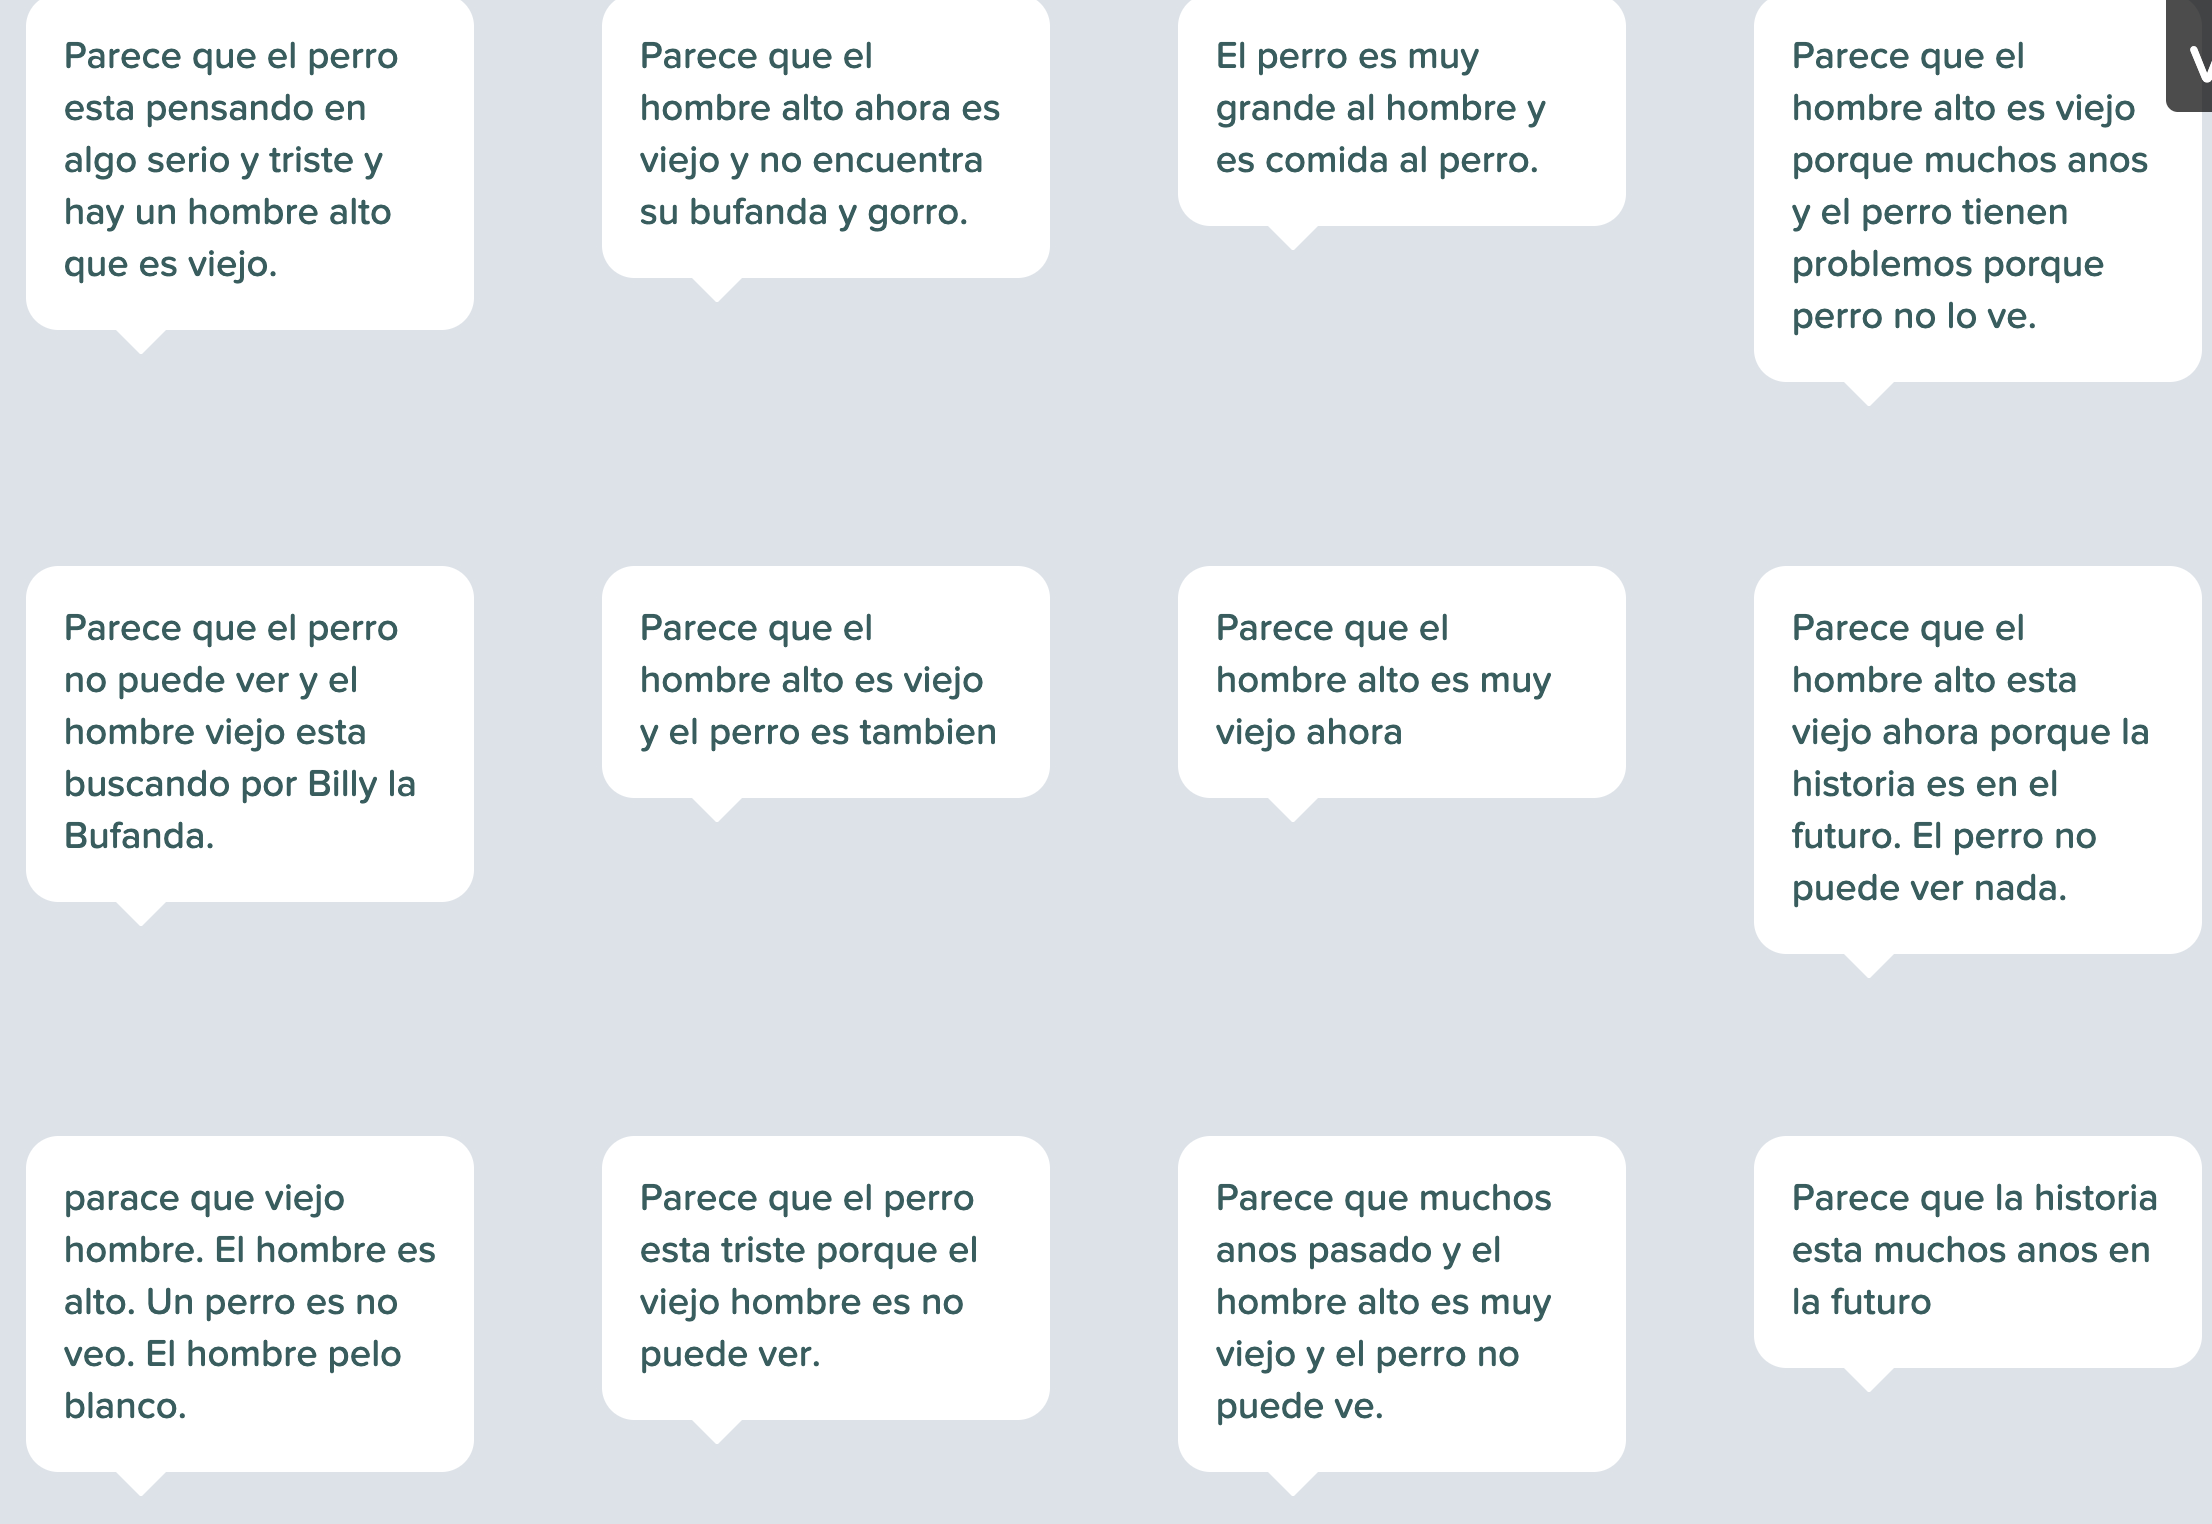
 This is what my level 1 students wrote (Providing comprehensible input all year DOES work, don’t you think?). I went through and made small corrections of grammar and added accents(although there a still a few errors on this file that I hadn’t yet fixed). The most common errors were actually with using ser/estar, which I’m ok with since it’s one of the last acquired structures. I was pleased to see different structures and vocabulary show up that they have heard in previous stories.
*Alternative: As you go over the predictions, you can use this to discuss even more. Ask questions like: “¿Cuál es más probable?”, “¿Estás de acuerdo con esta prediccion?”, “¿Es posible….?”, “¿Crees que ….. (Gorro mataría a Billy)??”, etc.
Step Four: Due to other time commitments, I am still not going to show the whole video. I am going to start by showing the first minute and let the anticipation keep growing.
Step Five A: If I had more time in the week to stretch out this lesson, the next day I would then play the next part of the video (from the beginning to when the Hand appears) on mute with only the instrumental music playing. Tip: Hit start on the video with no subtitles, turn the volume down/off on the video, and then click the music tab (the video will not stop playing), press play on the instrumental music, and then navigate back to the video tab and project this to your class. The students will be able to watch the video and soak up the visuals and only be able to hear the music without the lyrics.
Step Five-B: Unfortunately, I don’t have the time to do that so I am going to be using the subtitles with the video to reveal the true story (Well, until the credits at least. The post credits will be the next day!)
Edit: Here is the a link to the Google Slide with pear deck. Click on File and “make a copy” and you can edit it.


Pingback: Using Peardeck: a tutorial | SpanishPlans.org
Hi Justin! This is awesome. Thanks for sharing! Are you willing/able to share the peardeck that you created for this so I could use it with my students or do I have to make my own? Thanks!
Here’s the google slides: once it’s in your google drive, you can open it in your pear deck account.
https://docs.google.com/presentation/d/1PWRg83Rij53QKu2Mcy50sVArp8-8Xk1SaUFP0GBYxq0/edit?usp=sharing
Thanks so much! It’s much appreciated!!!!
Thanks so much for this fabulous idea! Would you mind if I used your google slides to do with my class? I will be sure to make a copy! I just requested access 🙂 . Thanks again!
Just responded. Let me know if you got it.
Thank you for sharing this! Figuring out Pear Deck is on my list of things to do!